Assumption:
- You are familiar with Azure working concepts
- You have an active Azure account
- You are familiar with Project Server Architecture specifically around remote event receivers
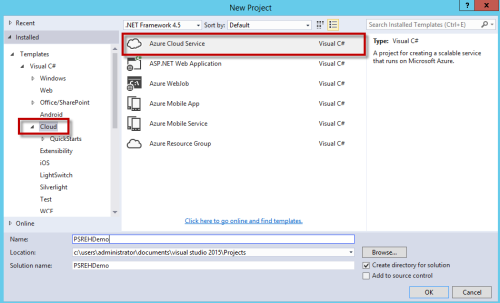
Step 1: Create A visual studio project >> Select Azure Cloud Service type project
Note: if you don’t have Azure Cloud Service template available >> install Azure SDK from Web Platform Installer
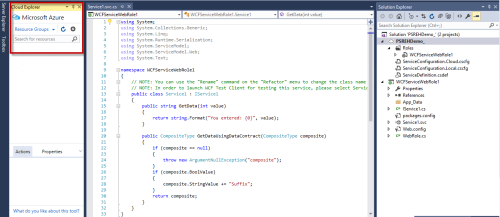
Step 2: Select the WCF web service role for this project

As soon as your project is created you would notice cloud explorer being available, we will use this later to publish / Deploy our WCF service to Azure, notice the Visual Studio project structure in solution explorer, further I renamed the WCF service and WebService roles you will see those later in the project

Step 3: Now that the Project has been added, it’s time to add assembly references, as you know since azure will not have any runtimes available it’s necessary to add below mentioned DLL’s you can find them on any Project Server installation servers
Note: these DLL’s should be 15.0.X.X version, add all the ones highlighted below, ignore the Microsoft.Office.Project.Shared

Step 4: Implement the IprojectEventRecieverRemote interface, as shown below add the required using statements
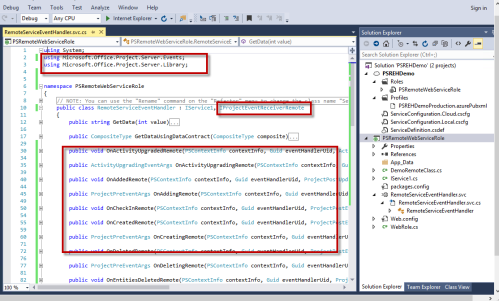
Step 5: Once the references has been added implement all the methods for the references
Step 6: Now that all the methods are available I will use one of the methods i.e. OnCreatingRemote, and add my own business logic
for e.g. I have added my little logic to cancel a project if it contains a specific keyword

Step 7: That’s it compile the project and procced with packaging >> right click solution explorer >> Package

For package choose the options as below, you may want to test it locally first but I was confident 😉

Now once the packaging is completed Visual studio will open up the packages in windows explorer for you to copy

At this time you have an option, either you can take the packages and upload & deploy them by logging onto your azure portal, or you can use Visual studio to publish / deploy right from within, just for convenience I would use VS to publish my Service
Below is a snapshot from my azure portal, as you can see I have already deployed it once hence it’s giving me options to update it, however if you are deploying it for first time after creating your cloud service it will ask you to upload the packages and then deploy it

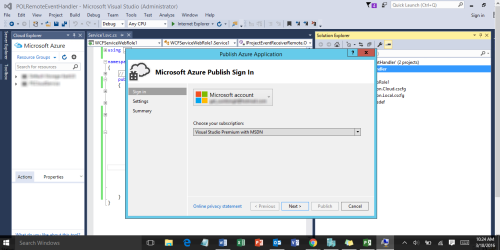
Step 8: Right click solution explore >> Publish >> it should ask for your Azure account logon credentials, typically I would already be signed in my cloud explorer to see my other azure resources

Check and set your common settings

Verify Summary
Step 9: Publish >> Your publishing should start you can check the publishing process in Azure activity log as below

It takes around 4-5 minutes to publish and deploy the service remember it does a lot of backend processing while it’s doing it for you< hence please be patient and wait until the process gets completed, even though after a while you would see the WebApp URL however wait until the whole process completes


As you can see below the process has completed now

Step 10: Go ahead and follow the link >> it should launch IE and you should be able to see your service hosted

Step 11: Verify and make sure you are able to browse your service and definition


Now since I have verified my service is working as expected, I would go ahead and register this with Project Online or could be Project Server 2013 On Premise, for registering I used a windows form to execute the code as shown below

This would register the event handler to online tenant, not that I use a fixed GUID instead of registering just so that I can keep track of my event handlers J
private SecureString getSecureString()
{
SecureString sec = new SecureString();
string password = “YourPasswordHere”;
password.ToCharArray().ToList().ForEach(c => sec.AppendChar(c));
sec.MakeReadOnly();
return sec;
}
private void btnRemoteEvent_Click(object sender, EventArgs e)
{
string userName = “UserName@Site.onmicrosoft.com”;
string OnlinePWA = “https://Site.sharepoint.com/sites/pwa/”;
using (ProjectContext PrjContext = new ProjectContext(OnlinePWA))//PWA Url
{
PrjContext.Credentials = new SharePointOnlineCredentials(userName, getSecureString());
PrjContext.EventHandlers.Add(new EventHandlerCreationInformation()
{
EndpointUrl = @”http://psrehdemo.cloudapp.net/RemoteServiceEventHandler.svc”,
Id = new Guid(“a1aa68bc-cf64-46d3-80a8-6f69af712294”), //You can choose to create new //Guid, i just wanted to keep track of the guid so that i can later unregister it
Name = “ProjectOnCreate – Remote Event Handler”,
EventId = (int)PSEventID.ProjectCreating,
Order =1,
CancelOnError = true,
});
PrjContext.EventHandlers.Update();
PrjContext.ExecuteQuery();
}
Step 12: Time to test the event handler, log onto your Project Online tenant >> Goto project Center >> New >> Enterprise project >> provide the name with the secret keyword (“rogue”) for me

If your event handler is working properly >> you should get an error while creating it

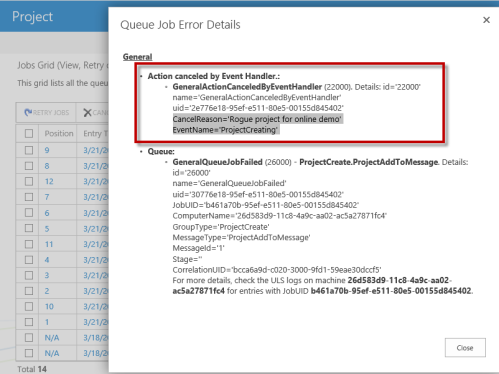
Time to check the queue and for sure I see project create having trouble Oh Oh

Quickly verifying the queue error message and for sure it’s the remote event handler 🙂


