Feeds:
Posts
Comments

Archive for May, 2012


As we all know Project server workflow are sequential workflow rather than state machine hence we cannot push workflow a stage back  when required, a typical scenario is project is in execution stage but for business reasons it needs to go on hold, now it could be handled multiple ways, the way i handle it by moving it to a new stage, now in project life cycle it needs to be again resumed in execution stage, we don’t know how many times a project can go on hold and then resume back, and since we cannot put all these stages in (as no of times is not definite) hence we use an alternate solution of restarting the workflow using PSI (WCF method instead of  ASMX) which includes using of skip to stage feature as well 🙂 so here goes the code which will help restarting the workflow and setting a stage

Note: on restarting the workflow you loose workflow history data from audit perspective, hence you need to have measures in place to retain those 🙂  

Add all the required references especially the ProjectServerServices.dll as described in technet documentation :: http://msdn.microsoft.com/en-us/library/ee767691.aspx


using System;
using System.Collections.Generic;
using System.ComponentModel;
using System.Data;
using System.Drawing;
using System.Linq;
using System.Text;
using System.Windows.Forms;
using System.Net;
using System.Security.Principal; // Required for the TokenImpersonationLevel enumeration.
using System.ServiceModel;
using System.ServiceModel.Channels;
//using Microsoft.IdentityModel.Protocols.WSTrust;
using System.Xml;
using System.ServiceModel.Security;
//using Microsoft.IdentityModel.SecurityTokenService;
using System.IdentityModel.Tokens;
using System.ServiceModel.Web;
using PSLibrary = Microsoft.Office.Project.Server.Library;
using System.Web.Services.Protocols;
using System.Xml.Serialization;

namespace WebServiceWCFTest

{

public partial class Form1 : Form

{

public Form1()

{

InitializeComponent();

}

static private Uri pwaUri;          // URI of Project Web App.

static private string pwaUrl;       // URL of Project Web App.

private void ChangeStage_Click(object sender, EventArgs e)

{

pwaUrl = @"https://ServerName/pwa/";

pwaUri = new Uri(pwaUrl);

//SetClientEndpoints(pwaUri);

//CreateWSSWorkspace(pwaUri);

const int MAXSIZE = 500000000;

const string svcRouter = "_vti_bin/PSI/ProjectServer.svc";

pwaUrl = pwaUri.Scheme + Uri.SchemeDelimiter + pwaUri.Host + ":" + pwaUri.Port + pwaUri.AbsolutePath;

// Create a binding for HTTP.

BasicHttpBinding binding = null;

if (pwaUri.Scheme.Equals(Uri.UriSchemeHttps))

{

// Create binding for HTTPS.

binding = new BasicHttpBinding(BasicHttpSecurityMode.Transport);

}

else

{

// Create binding for HTTP.

binding = new BasicHttpBinding(BasicHttpSecurityMode.TransportCredentialOnly);

}

binding.Name = "basicHttpConf";

binding.SendTimeout = TimeSpan.MaxValue;

Console.WriteLine("SendTimeout value:\n\t{0} days,\n\t{1} hours,\n\t{2} minutes,\n\t{3} seconds",

binding.SendTimeout.Days.ToString(), binding.SendTimeout.Hours.ToString(),

binding.SendTimeout.Minutes.ToString(), binding.SendTimeout.Seconds.ToString());

binding.MaxReceivedMessageSize = MAXSIZE;

binding.ReaderQuotas.MaxNameTableCharCount = MAXSIZE;

binding.MessageEncoding = WSMessageEncoding.Text;

binding.Security.Transport.ClientCredentialType = HttpClientCredentialType.Ntlm;

// The endpoint address is the ProjectServer.svc router for all public PSI calls.

EndpointAddress address = new EndpointAddress(pwaUrl + svcRouter);

SvcWorkflow.WorkflowClient WrkflowClient = new SvcWorkflow.WorkflowClient(binding,address);

#region UID

ICredentials credentials = new NetworkCredential("Username", "Password", "Domain");

#endregion

WrkflowClient.ClientCredentials.Windows.ClientCredential = (NetworkCredential)credentials;

WrkflowClient.ClientCredentials.Windows.AllowedImpersonationLevel = System.Security.Principal.TokenImpersonationLevel.Impersonation;

WrkflowClient.ChannelFactory.Credentials.Windows.AllowedImpersonationLevel = TokenImpersonationLevel.Impersonation;

WrkflowClient.ChannelFactory.Credentials.Windows.AllowNtlm = true;

WrkflowClient.Endpoint.Address = new EndpointAddress(pwaUrl + "_vti_bin/PSI/ProjectServer.svc");

using (OperationContextScope scope = new OperationContextScope(WrkflowClient.InnerChannel))

{

// Disable Forms authentication, to enable Windows authentication.

WebOperationContext.Current.OutgoingRequest.Headers.Remove("X-FORMS_BASED_AUTH_ACCEPTED");

WebOperationContext.Current.OutgoingRequest.Headers.Add("X-FORMS_BASED_AUTH_ACCEPTED", "f");

try

{

SvcWorkflow.WorkflowDataSet WfDS = new SvcWorkflow.WorkflowDataSet();

Guid PrjUID = new Guid("XXXXXXXX-XXXX-XXXX-XXXX-XXXXXXXXXXXX ");

Guid JobID = Guid.NewGuid();

Guid EptUID = new Guid("XXXXXXXX-XXXX-XXXX-XXXX-XXXXXXXXXXXX ");

Guid NewStageUID = new Guid("XXXXXXXX-XXXX-XXXX-XXXX-XXXXXXXXXXXX"); //New Stage ID

//  WfDS = WrkflowClient.ReadWorkflowStatus(PrjUID,true);

WfDS.UpdateProjectWorkflows.AddUpdateProjectWorkflowsRow(JobID, PrjUID, EptUID, false, NewStageUID);

WrkflowClient.QueueUpdateProjectWorkflows(WfDS);

WrkflowClient.Close();

WrkflowClient = null;

}

catch (System.ServiceModel.FaultException fault)

{

string errAttributeName;

string errAttribute;

string errOut;

string errMess = "".PadRight(30, '=') + "\r\n"

+ "Error details: " + "\r\n";

PSLibrary.PSClientError error = GetPSClientError(fault, out errOut);

errMess += errOut;

PSLibrary.PSErrorInfo[] errors = error.GetAllErrors();

PSLibrary.PSErrorInfo thisError;

for (int i = 0; i < errors.Length; i++)

{

thisError = errors[i];

errMess += "\r\n".PadRight(30, '=') + "\r\nPSClientError output:\r\n";

errMess += thisError.ErrId.ToString() + "\n";

for (int j = 0; j < thisError.ErrorAttributes.Length; j++)

{

errAttributeName = thisError.ErrorAttributeNames()[j];

errAttribute = thisError.ErrorAttributes[j];

errMess += "\r\n\t" + errAttributeName

+ ": " + errAttribute;

}

}

MessageBox.Show(errMess);

}

}

}

}

}

Read Full Post »


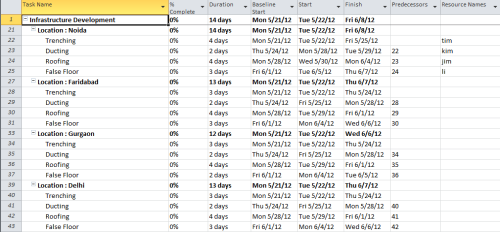
There are times when you want to represnt a set of similiar kind of tasks in different color format for Graphical Reporting to Management, then cames into scene our very popular Gantt Chart. There are projects where-in there are repeated set of tasks under different Groups; like in Agile Projects having Sprints – each of which list same set of activities under different Sprints. Other example can be an Infrastructure Projects of different sites or a Telecom project tracking different locations for same set of activities.

We can use the Gantt Chart to represnt it graphically very constructively. Here I have used a small example of tracking 4 sites of an  infra project for similiar set of activities:

Trenching
Ducting
Roofing
False Floor 

Requirement 1) I have 4 sites to track, so I want to represent all Trenching tasks in same color; all Ducting in same and so on for each site.

Requirement 2) I want to show all delayed tasks progress in RED ; Future Tasks which started ahead of time in BLUE.

So, I created a Project Plan as below and Baseline it.

By Defualt the Gantt Chart have all Blue Bars. Now I want to pull colored Gantt Bars on given conditions as in Requirement 1.

Trenching – Blue

Ducting – Orange

Roofing – Purple

False Floor – Mauve

Requirement 1

Step 1) Firstly, I have to just filter out these 4 tasks for all 4 sites. Go to View -> Filter -> More Filters -> New Filters -> then as in snapshot

Apply this Filter, it will list out all 4 sites with these tasks.

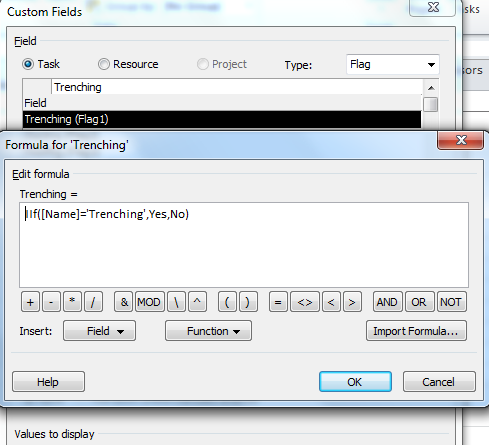
Step 2) Now to get colored bars we have to create 4 Flags for these task types, I’m showing here for 1 task rest are created in similiary. Insert Custom Field Flag 1 now customise it, rename it as “Trenching” and add a Formula to it as below.

So now it will have all “Trenching Tasks” set to Yes in this Flag 1.

Follow same steps to create rest of the 3 flags also for “Ducting” , ” Roofing” & “False Flooring”

Step 3) Now we have to define colored bars for these 4 Tasks. Right Click on Gantt Chart -> Bar Styles

Under Task insert 4 rows as “Trenching” , “Ducting” , ” Roofing” & “False Flooring” and add each Flag # against each task. Like I created Flag 1 for Trenching I added it to “Show for..Tasks” section, Flag 2 for Ducting, Flag 3 for Roofing and Flag 4 for False Flooring, which we created in Step 2.

In the Bars tab below you can set colors as required, in the Text tab select the Name of the Task to be displayed in Left.

Here color Bars is shown for Trenching.

I added Task Name on Summary Bar also to represnt Site Locations, see the selection below.

 See how Text Tab is used to reflect Name in Right.

So, your chart is all set for Reporting.

Requirement 2

Here, I have to show Progress of tasks based on their Status.

Late Tasks – > RED progress

Tasks Started Ahead of Schedule -> BLUE progress

While rest of the tasks are shown as normal progress bars.

Step 1) We have to again create 2 Flag fields to reprsent these 2 tasks, use Step 2 as in Requirement 1 to create Flag fields, use Flag 5 for Late Tasks and Flag 6 for Started Ahead Tasks.

Formula for Late Tasks (Late Indic) in Flag 5 :

Similiary create Flag 6 as Early Started Tasks with following formula :  IIf([Baseline Start]>[Start],1,0) make sure you have Baselined your Project.

Step 2) Now that we have another 2 Flags to identify the Late Progress and Ahead Tasks, we want to represent them with color code. Again open Bar Styles by Right Clicking on the Gantt Chart. Scroll to the bottom of the list and insert these 2 types as shown below.

I have added both the Flags as shown in figure.

Now look at the progress bar on late tasks and tasks starting ahead of time.

I have highlighted the tasks in table in same color in which they are appearing in progress bar in the Gantt chart to make it clear. Its visible that late tasks have RED progress and Early Taks BLUE.

Now to share with Management I can print the PDF of it and share.

Here comes my PDF to share across for Reporting.

This is very helpful not only for Infra Projects but Agile Projects too, with some slicing and dicing done here and there to represent it as required.

Though I know I’m a lazy blogger, but I will try to come up soon with another interseting post soon. 🙂

Read Full Post »


At times we need the ability to hide / show ribbon buttons as per the requirement, now any sharepoint developer can do this very easily, just illustrating this for people who have little development experience but know visual studio a bit 🙂

So as usual brief context on why this was done, we didn’t wanted our users to navigate to project center and use the new button to create project from there since we wanted users to first narrow down on what type of EPT they should choose while creating a new project, as in our environment we have over 30 EPT’s to select from, and as part of the process the select several options and based on that the custom webpart automatically launches an EPT 🙂 and hence we wanted to hide the New project button form Project center

so here goes snapshot followed by short one liner code, obviously embedded in webpart but can be also used in Javascript CEW with bit of research 🙂

Create a visual web part project, of course you can choose other type of projects to proceed with 🙂

reference the required assemblies and use this code in code behind cs file of user control

<div>using System;</div>
<div>using System.Web.UI;</div>
<div>using System.Web.UI.WebControls;</div>
<div>using System.Web.UI.WebControls.WebParts;</div>
<div>using Microsoft.SharePoint.WebControls;</div>
<div>using Microsoft.Web.CommandUI;</div>
<div></div>
<div>namespace CustomRibbonElements.HideNewBtn</div>
<div>{</div>
<div>    public partial class HideNewBtnUserControl : UserControl</div>
<div>    {</div>
<div>        protected void Page_Load(object sender, EventArgs e)</div>
<div>        {</div>
<div>            SPRibbon ribbon = SPRibbon.GetCurrent(this.Page);</div>
<div>            ribbon.TrimById("Ribbon.ContextualTabs.ProjectCenter.Home.Editing.NewProject");</div>
<div>        }</div>
<div>    }</div>
<div>}</div>
<div>
=======================Alternative way by using Content editor web part=======================
</div>
<div>

<script language="javascript" type="text/javascript">

function RibbonFunction()
{

// Gets a reference to a CUI.Ribbon object (CUI.js)

var ribbon = SP.Ribbon.PageManager.get_instance().get_ribbon();
'Ribbon.Read' if the Browse tab is selected.

alert(ribbon.get_selectedTabId());

//ribbon.TrimById("ribbon.ContextualTabs.ProjectCenter.Home.Editing.NewProject");
}

SP.SOD.executeOrDelayUntilScriptLoaded(function()
{

var getInst = SP.Ribbon.PageManager.get_instance();
getInst.add_ribbonInited(function() {
RibbonFunction();
});

var ribbon = null;

try

{

ribbon = getInst.get_ribbon();

}

catch (e) { }

if (!ribbon)
{
if (typeof(_ribbonStartInit) == "function")

_ribbonStartInit(_ribbon.initialTabId, false, null);

}

else {
RibbonFunction(); }

},
"sp.ribbon.js");
</script>

Read Full Post »


Have been hearing a lot from users they wanted to have a custom unique ID for project, though project name itself  is unique and the Project GUID, but for most cases Project GUID doesn’t makes sense & name sometimes isn’t that effective, in my case it all goes back to old 2003 project server system where in there were 2 disparate systems being maintained one for creation & selection of project (custom sharepoint based solution) and once the project was selected for execution it was pushed to project server for execution & monitoring, now to have a correlation between both the systems we used an auto generated numeric identifier, which has been base for couple of reports too and these numeric codes were carried over in 2007 system when we migrated, with 2010 system we consolidated the two systems and now everything is being managed into one system but however end users were  reluctant to give away the unique numbering system 🙂 hence we had to devise a way to auto generate these numbers, i know which can be easily done by customizing and having a web part, but our problem was a little more complex, end users wanted this number to be generated on the very first initial (New Project ) page and should be saved and to be made available in project center as soon as a project is saved and created, ok so that was the background now coming to the solution 🙂

Couple of things to note we made a decision to have these unique ID entries in a custom SQL table, reason being we are using it for other purposes, you might want to tweak it as per your requirement

1. Create custom webpart, place it on the new project PDP page, Custom webpart on load searches through the custom table and allocates an unused unique ID to the project which is shown on the PDP page, the webpart itself renders the ID, it also checks if there is already a unique ID assigned, if yes just display and donot set, if not available set the value, this way this web part can be used in multiple places on different pages throughout the workflow

2. Have a custom field created for Unique ID, add it to the PDP page in hidden mode, as soon as the custom webpart is loaded it writes the value in custom field using javascript 🙂

Note:: Always place custom web part below the unique ID custom field web part

Now once the Unique id has been set in the UniqueID custom field, you can insert corresponding Project UID anywhere in the workflow in the custom table against the unique ID generated, to correlate with other LOB system, or you can just leave it if not required, since you already have this value in the project level custom field J

now getting to the actual code, should be simple enough 🙂 first couple of snapshots, before i proceed to the code 🙂

1. Create a table


/****** Object:  Table [dbo].[tbl_ProjectUniqueID]    *****/

SET ANSI_NULLS ON

GO

SET QUOTED_IDENTIFIER ON

GO

CREATE TABLE [dbo].[tbl_ProjectUniqueID](

[UniqueID] [bigint] IDENTITY(2000,1) NOT NULL,

[ProjectUID] [uniqueidentifier] NULL,

CONSTRAINT [PK_tbl_ProjectUniqueID] PRIMARY KEY CLUSTERED

(

[UniqueID] ASC

)WITH (PAD_INDEX  = OFF, STATISTICS_NORECOMPUTE  = OFF, IGNORE_DUP_KEY = OFF, ALLOW_ROW_LOCKS  = ON, ALLOW_PAGE_LOCKS  = ON) ON [PRIMARY]

) ON [PRIMARY]

GO

2. Create Visual web part project in visual studio and use the code 🙂

Java script function to copy unique ID generated in Project Custom field, place this in control.ascx file 🙂


<script type="text/javascript">

function SetUniqueID(ProjectUniqueCFGUID, UniqueID) {

try {

var arr = document.getElementsByTagName('input');

for (var i = 0; i < arr.length; i++) {

if (arr[i].type == 'text' && arr[i].GUID == ProjectUniqueCFGUID) {

arr[i].value = UniqueID;

break;

}

}

WPDPParts[0].IsDirty = true;

}

catch (ex) { }

}

</script>

/////////////////////CODE BEHIND FOR VISUAL WEBPART/////////////////////


using System;

using System.Web.UI;

using System.Web.UI.WebControls;

using System.Web.UI.WebControls.WebParts;

using Microsoft.Practices.EnterpriseLibrary.Data.Sql;

using System.Data.Common;

using Microsoft.SharePoint;

namespace CreateUniqueID

{

public partial class CreateUniqueIDUserControl : UserControl

{

public CreateUniqueID CreateUniqueIDWebPart { get; set; }

protected override void OnPreRender(EventArgs e)

{

base.OnPreRender(e);

if (this.CreateUniqueIDWebPart != null)

{

if (this.CreateUniqueIDWebPart.isMandatory == true)

this.lblFieldName.Text = this.CreateUniqueIDWebPart.FieldName + "<span class="ms-alerttext">* </span>";

else

this.lblFieldName.Text = this.CreateUniqueIDWebPart.FieldName;

this.lblFieldDesc.Text = this.CreateUniqueIDWebPart.FieldDesc;

}

}

protected void Page_Load(object sender, EventArgs e)

{

if (Request.QueryString["ProjUid"] == null)

{

if (!Page.IsPostBack)

{

int UniqueID = GenerateUniqueID();

if (UniqueID > 0)

{

string UniqueIDGuid = “xxx-xxxxx-xxxxxxx-xxxx”;

lblUniqueID.Text = onboadID.ToString();

ScriptManager.RegisterStartupScript(this, GetType(), "initializeVar", " SetUniqueID('" + UniqueIDGuid + "' , '" + UniqueID.ToString() + "');", true);

}

}

}

}

private int GenerateUniqueID()

{

try

{

String Connect = “Enter connection string here”;

SqlDatabase dbepm = new SqlDatabase(Connect);

DbCommand cmdSubmit;

cmdSubmit = dbepm.GetStoredProcCommand("usp_CreateProjectUniqueId"); // You can use sql command / text here to execute

int Id = Convert.ToInt32(dbepm.ExecuteScalar(cmdSubmit));

return Id;

}

catch (Exception ex)

{

return 0;

}

}

}

}

Read Full Post »


Microsoft Project doesn’t let you paste a value into a range of cells like Excel. So, instead of typing in durations, names, dates etc. or pasting one at a time, there is a “Fill Down” and “Fill Up” menu option. Select the cell that contains the value you want to copy, select the range, select Fill, and select “Fill Down” or “Fill Up.” In Fill Down case the value of first cell gets copied in range and in Fill Up value of last cell gets copied in upper cells.

This can be done either by Right Clicking or going to Task Tab -> Editing -> Fill.

In snapshot below I have highlighted the cells in green, that I will select as range for Fill Down Option. I want to copy duration of Task ID 4 i.e. 6 days to all tasks below.

I select the range and Click on Editing -> Fill -> Fill Down, it fills in durations as 6d for all selected tasks.

Values got copied.

Read Full Post »

Older Posts »